Showing posts with label Tools. Show all posts

Tuesday Tip: Illustrating Zebra

Tuesday, May 15, 2012
This week I have another animal print illustration tutorial, zebra print. Similar to leopard print, which I wrote about here last tuesday, its organic, fluid and always different, therefore pretty difficult to mess up. 
The key to a successful zebra print rendering is having a brush tip marker for the stripes. A brush tip is essential because you have to really "work" the marker tip. By pressing down hard for the thick areas then releasing up to the thin tip, you can achieve sharp points that create those fluid zebra stripes. Something else to keep in mind is the zebra stripe needs to be darker that the base color you choose. Here I chose black and white, but even in the examples below, with the more contrasting combinations, I rendered the stripes always darker than the background. It is possible to reverse them and render the stripes light with a charcoal pencil or gauche, but its not something I practice or recommend.
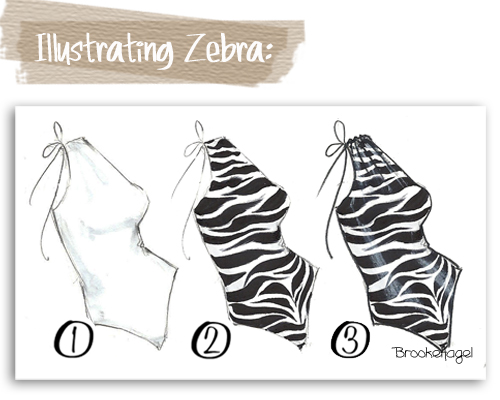
1- Color the base coat color and fabric shadows. For my example here since I went with a classic black and white print, I skipped putting in a base coat and only drew in shadows, which you can see in faint gray on the left side of the bathing suit, beneath the bust, and into the shoulder gathers. 

2- The zebra stripes are next. As I said, a brush tip marker is vital for these to be really successful. You can start your stripes from the top of the garment in simple horizontal stripes then alternate from side to side. (See example below.) First a thick stripe coming out from the left side of the garment into a thin center line. Then from the right, pressing my marker down on the right side and releasing the marker tip up into the center just below the previous stripe from the left. And so on, covering the whole garment. 
 You can also start with or put somewhere in your print a "V" formation. This will mimic the center of a real zebra hide. (As I did towards the lower half on my bathing suit illustration.) If you'd like to opt for something more stylized or just do not want that center V shape, then you can stick to stripes, as I did with some of the illustrations below. 

3- Highlights. With a white pencil or white charcoal add highlights. This will give the print depth and dimension. I added highlights along both front sides (or princess panel area's for those of you design students) as well as into the gathers at the shoulder. 
Similar again to leopard, zebra can be rendered in any combination of colors to achieve different looks. Shown here (above) are two illustrations I drew with browns and natural tones for a more natural/safari look. While below are two where I went a little nuts with color. The first one on the left is a very 80's vibe with the saturated fuchsia and black combo and the one on the right is something a little sweeter, a pale pink background with coral stripes. 

Zebra is truly one of my favorite prints to illustrate, paint, and have in little bursts around me, like on my umbrella, a clutch or scarf. In college I even had an entire accent wall of my bedroom that I painted in black and white floor-to-ceiling zebra stripes! Its classic and chic and in my book a fashion staple. 

Let me know in the comments section how your zebra stripes turn out and what Tuesday Tip tutorials you'd like to see in the future.

(For this post I used pencil, white charcoal and Copic Sketch double-ended markers, offering both medium broad and super brush tips.) 

Tuesday Tip: Illustrating Leopard

Tuesday, May 8, 2012
Have you always wanted to learn how to accurately illustrate leopard print? Well its your lucky day, and you may be surprised to learn that leopard just so happens to be one of the easiest and most foolproof prints to draw and draw well. Being an animal skin, leopard print is organic, some parts are clustered and messy and some are open and spacey. You really can't make a mistake with this one I promise.
1. The first step is to choose your color way, and the three markers you'd like to use for the print. With the lightest one you lay the ground color for the print. I chose a dark tan color, in order to render a more realistic leopard print.

2. Let your base color dry then add a second "coat" in streaky and somewhat rough stripes, one being down the center and then as few or as many as you'd like to each side. This will add depth to the print.

3. Choose a marker that is darker than your ground color and randomly draw comma or kidney shaped "spots" with it, as I've illustrated for you in step three with brown.

4. With your darkest marker (I used black) draw three dashes or kidney shapes of varying lengths surrounding each of the kidney shapes you drew in the step three. Its as though you're messily outlining each spot with three dashes.

5. Add highlights, shadows and any garment design details with your black and white (or white charcoal) pencils. And ta-da! There you will have a classic leopard print.
Its been quite a while since my last Tuesday Tip post, but I figured what better way to get back into the tutorial mode than by showing you how to render this fun and classic print. Since I drew the tutorial in standard leopard colors I thought I should also show how easy it is to use the same steps but with colors that are a little more on-trend. Gray, black and white shown above, is a little more pop and edgy and the purples below are a colorful alternative.
If you're hungry for more you can check out my previous Tuesday Tip here, and come back next week because I'm working on another one for you. (I promise not to wait almost 2 years for another one this time!)

***I'm also taking suggestions so let me know in the comments section if there's a tip you'd like to see to help improve your fashion illustration skills.

Instagram Addict

Monday, May 7, 2012
As my friends can attest to I'm a bit of a picture taking fanatic, therefore my favorite iPhone app has quickly become Instagram. In the past few months I've become a little obsessed and have been sharing everything from sneak peaks at projects I'm working on and quick sketchbook doodles, to my diy's, glimpses into my apartment and the occasional shot while out and about in the city. Shown here are a bunch of my recent favorites, but you can check out more of my pictures by following me, Brooklit. (I often share my photo's from Instragram through twitter too, which I also go by Brooklit.)
Instagram has many wonderful aspects to it but a favorite of mine is the ease of editing your images with color effects, brightness and adding a blur which you can easily adjust the size and focus of. Its so much quicker and easier than importing to photoshop. Its also fun to see what your friends are up to and "like" and/or comment on images that they post. (Here's a peak of my latest Instagram pic of a new Tuesday Tip I'm working on.)

You can now turn your Instagram photo's into something more; prints, books, magnets, even iphone cases. My friend Holly Becker of Decor8 recently did a wonderful round up of printing options for your Instagram shots, which you can check out here. I'll certainly be placing orders from a site or two from her list soon.

(All images taken by me on Instragram, @Brooklit)

Copic Marker Guest & New Print

Tuesday, May 1, 2012
As you probably know from reading Fabulous Doodles I love my Copic Markers, so needless to say I was thrilled when they contacted me and asked me to write a guest post of a bridal illustration tutorial for their blog. Instead of featuring one of my custom bridal illustration client projects I decided to create a new, and more stylized, bridal print. If you'd like to read about my process from start to finish you can check out the guest post I wrote on the Copic Marker site.

I like this new sketch so much that I decided to add her to Brooklit Bride, my Etsy bride shop. I rarely alter my sketches once they're completed but I did tweak this print in photoshop so its slightly different than the one Copic featured. I elongating the black sash to just beyond the gown's train. Proportionally it just seems to work better. Hope you like the newest Brooklit Bride print, sultry, sophisticated and sexy Victoria.

Secret Weapons {Part 3}

Tuesday, April 17, 2012
I am continually asked what tools I use most in my fashion illustrations so I thought it was time for another installment of Secret Weapons. First up, is my sketchbook and paper of choice. This may come as a surprise, being that I make a living as an artist you may think I'd use something fancy and expensive from an art supply store, but I do not. For years I've been using these Barnes & Noble exclusive sketchbooks. The reason I like them so much is that the paper is thick, almost a card stock, and super bright white. The whiteness is important to me because I scan most of my work. They have a spiral binding, which I prefer so the book can lay flat, thick hardcovers that protect the pages well, should I decide to throw in my bag, and the piece de resistance is they have perforated pages for easy tearing out. They also come in different sizes, so I have small ones (above) for quick thumbnail sketches and traveling, and larger ones for my more polished sketches. (Keep in mind however that these are not the best choice for a beginners because, as I mentioned, the paper is thick, and not conducive to tracing. It also soaks up the marker, which means you have to move fast. When I was in college, and learning, my paper of choice was Bienfang marker paper.)
Next I'd like to share the white charcoal pencil. These are fantastic for creating highlights over marker, even better than white pencils because of how dense and opaque they are. If you take a look at my last post about my new print Miriam, you can see that I used a log of the white charcoal pencil to render the large brimmed hat and create texture and highlights within it. I also use it to add shine and highlights to hair in almost all my illustrations.

Lastly is something I absolutely cannot live without when sketching, the amazing kneaded eraser. It picks up everything from the faintest smudge to heavy thick lines. Its pliable and can be molded to easily into a sharp point or stretched out for easily self cleaning and it doesn't leave marks. The kneaded eraser is a must have. (I realize I sound like a infomercial here, but its true!)

For more of my secret weapons you can check out part 1 and part 2 here.

Fabulous Doodles 2011 Gift Guide

Sunday, December 11, 2011
Looking for the perfect holiday gift for your fashion-design-major little sis, your artistic 4 year old niece, or your impossible to shop for yet fabulous bff? Well look no further, because I've assembled the perfect gift guide for the fashion loving artist in your life.
The first gift of the guide, for The Fashion Student is the (1) jumbo button box. It's ideal for art supplies (or jewelry) and is on my personal wish list. The (2) Aphrodite USB hub adds the right amount of kitch to any workspace. (3) 101 Things I learned in Fashion School is an incredibly informative little book for any design freshman. These (4) sketch books are the ones that I use for all my illustration work. They come in 2 different sizes, have thick bright white paper, and perforated edges that make a clean tear. The (5) mini pink sewing machine would be great for that last minute hem adjustment. (Or for a person with a tiny apartment who's too lazy to get out their big sewing machine from storage. . .like me :)
(1. Fashion Illustration Mini Print $6, 2. Snapshot Frames, set of 5 $10, Button Magnets $25 3. Gold iPhone Receiver $78, 4. Kate Spade iPhone Case $40, 5. Valentino Book $47.25)
For The Hard to Shop for Fashion Friend: My (1) fashion illustration mini-prints would be great for any fashion minded girl. Maybe your bff with a new office or apartment to decorate? The button or snapshot frame magnets would be adorable to adorn a cubicle or fridge. The Kate Spade gold dot iphone case is my new favorite thing! I have it, and get comments on it daily. (And the limited edition gold retro hand held phone is just begging to be paired with it.) Buying a book about your friends favorite designer is brilliant. I received this beautiful Valentino book as a gift. It not only contains a plethora of stunning photos and sketches from the legendary designer but also looks amazing on a coffee table.
Little Etsy Extras: Looking for that extra little gift thats the perfect unique handmade addition to your gift, Etsy is the website for you. Can't afford Chanel, you can pick up this beautiful (1) signed pencil drawing print. The (2) colored pencil stud earring make for a fun and quirky gift. A (3) pocket mirror from my shop would be a great little addition to a cosmetic or handbag purchase. The (4) sterling silver scissors are a great charm necklace for any designer, crafter or artist. The chevron striped pouch makes for a very chic pencil case and a pack of (6) fashion illustration flat note cards from my shop would be lovely to get in the mail thanking you for the fabulous gifts.
(1. Jumbo Clipboard $167, 2. Crayon Maker $44.98, 3. Face Plate $10.99, 4. Aquadoodle $43.88)
For The Little Artist: In my doctors office I fell in love with possibly the coolest looking (1) wall easel/clip board with a roll of paper to continuously draw and paint. The (2) Crayola crayon maker would have been life changing as a child! With these (3) face plates its now okay to play with your food. And last but not least, (4) Aquadoodle, the toddler toy that allows them to make art with just water. I've played with this at my friends house and I love it! (I've actually fought with a 3 year old over the water pen!)

Fashion Illustration Exposed

Wednesday, July 28, 2010
A little while ago, I was contacted by the lovely Julia Stanescu of Fashionarium. She asked me if I would be willing to write two tutorials as a contributing fashion illustrator. Well I jumped at the opportunity and now I'm excited to tell you about the fabulous new book Fashion Illustration Exposed.
This book empowers readers to easily explore practical techniques of fashion illustration while learning about the tools and steps that ten fashion illustrators (including yours truly) employ. Mediums such as watercolor paint, pen, collage, and photoshop are all touched upon. (It has even inspired me to dig out my old watercolors and guaches that I haven't touched since college!)
It's such a thrill for me to be included in this book. I hope you all like it and like myself, learn something new. Fashion Illustration Exposed is available as a printed paperback as well as a downloadable ebook, which ten of my readers can purchase with a discount of 20% off. Its available by clicking here, and the discount code is brooklit. (The discount is only available to the first 10 Fabulous Doodles readers to purchase.)

Tuesday Tip: Sequins

Monday, June 21, 2010
A while back you may remember I wrote about my favorite tools for fashion illustration and I mentioned the whiteout pen. Well to successfully render sequins a whiteout pen is vital. (At least for this fashion illustrator!) It's also best when choosing your marker to pick a very wet and saturated marker, like a Chartpak and a classic black Sharpie marker.
I happen to really enjoy rendering sequins, especially all-over sequins (a-la Diana Ross or Cher.) There are a few specific steps to it, but don't stress, its pretty hard to mess up. And once you complete them the results are stunning.
  1. You begin by coloring the base of your design. Its important to leave white streaks where you want your highlights. Let it dry a little then add a second coat of your color to areas in shadow (see example #1.)
  2. Outline the design, draw any seams, and add any extra shadowing with a dark pencil. I use the Prismacolor cool gray 90% pencil. (#2)
  3. With your black Sharpie stipple dots all over the garment (#3). Load up on dots in areas that are white and are going to be a highlight.
  4. With your whiteout pen place a dot on top of each black one. Get a rhythm going and it will be over before you know it. (#4)
  5. This is not a necessary step, but I like to add a few faint "X's" with my finest tip black pen to create subtle streaks of light. (I use a Micron pen, tip size 005)
The white dots will absorb the color you put down first, especially if you used a very wet marker. The dots will turn into a lighter shade of your color. This is why if you look at my examples, they don't look like white sequins on colored fabrics. It looks as though I've actually painted all these little colored sequins! And the tip of the Sharpie, being almost the same width as the whiteout pen, creates the perfect shadow to make each sequin pop.

Above are illustrations from my Etsy shop of Carrie and Samantha (from the first SATC movie), both sporting fabulous sequin pieces. Carrie is available in a print, magnet or bookmark, and Samantha is on a bookmark.

Secret Weapons {Part 2}

Wednesday, February 3, 2010
I received such great feedback last time, so I thought I should open my bag of tricks and share more of my favorite art supplies for tackling fashion illustration. First up; colored pencils. I know there's no big shocker here, but since people have asked I thought I should share with you the brand I prefer, Prismacolor.
In my previous secret weapons post I told you about the importance of cool gray 90%. Other colors I have on heavy rotation are white,blush pink, peach, dark brown, cream, and cinnamon. I try to be delicate with these pencils and store and carry them separate from your markers. A little "tip": if they get banged around a lot then the inner lead breaks and its practically impossible to get a good point on them. I keep my most frequently used colors in my new penguin pencil holder from Duck Drake Studio. After assembling my holiday gift guide I had to have it! It's ceramic with a white matte background and shiny glazed penguin and inside.
Prismacolors are on the soft side, which I like when drawing but the down side is that they need to be constantly sharpened. This brings me to the next vital weapon in my arsinal; the electronic pencil sharpener. After going through a few of them over the years I've settled on this Panasonic battery opperated one. It gives a nice long point and has a good amount of power, especially for being battery operated.
Micron pens are essential for intricate details. They come in a few colors and many sizes but the one I have to replenish the most is the 005 in black. This is a superfine tip, only 0.2mm line width of waterproof pigment ink. I often use this pen to render lace, as you can see here on Audrey II and for line drawings, like my lined ladies.
And last but not least, eyeshadow. Yes, eyeshadow. I have a few different uses for it, but mainly I use it for poufy/curly hair (as on Blair here), fluffy feathers (like the ones here on Marie), and to render fur, which I softy add faint pencil lines to. Unfortunatly I don't have any illustrations handy with fur, but I promise I use it and it works brilliantly. The best shadows to use are the cheapest ones your drugstore has, like Wet'n'wild or N.Y.C. They come in a million shades, can be as cheap as a dollar, and come with the mini spounge tipped applicator wand which is the ideal tool I use to color directly to the paper. I recently did a big cleaning of my apt and threw mine out figuring I'll just buy new the next time I need it. That's why the shadows pictured here are a little fancier that the drugstore ones, but I promise the junkier ones work better. Hope this helps everyone, happy drawing.

Secret Weapons

Friday, December 11, 2009
Every so often I receive an email asking what art supplies I use and which brands I prefer. I answer all emails and try to be as specific as possible, but I thought maybe it was time I blogged about it. Maybe your interested and just haven't asked me, and if not, at least in the future I can just refer inquiring minds to this post. So without further ado here are the top products I absolutely could not live without. (As far as illustrating for my etsy shop goes! If we're talking desert island or beauty essentials that's a different post for a different blog! ;)
First and foremost are the Prismacolor pencils in cool gray 90%. I use this pencil on EVERY single illustration. Black can be too harsh, especially when outlining the figures and drawing facial details. These pencils (I pluralize that because I usually have anywhere from two to ten of them on my desk at one time) are an essential must have, at least for this fashion illustrator. It's my finishing touch tool, that I outline with, add the facial details, and all the clothing seams and trims.
Brush-tip markers are next. Sometimes people are surprised that my illustrations are all created with markers and pencil. I'm pretty sure the reason for this because of the amazing watercolor and painterly effect of the brush tip markers. With a brush tip marker you can create a multitude of effects to render fabrics, hair, and skin.
There are two brands that I use. One is the Copic Sketch double ended marker (shown above.) One side is a broad and blunt 1/4" slanted marker tip, and the other side is saturated brush tip. These markers are definitely on the pricey side at $6.99 each, but once I started using them (just a few years ago) I was hooked. I have every value of warm and cool grays for all my bridal illustrations as well as about 8 skin tone options. And of corse all the colors I use for clothing, shoes and accessories.
The second brand of brush-tip marker I use are the Staedtler Mars Graphic 3000's. They are also double ended, but with these one end is a fine tip and the other is the brush. I've been using these to render hair ever since my college days and feel that they're really the secret to my success behind some of my most popular fashion illustrations like Vogue, Hostess, and Lily.
The last "secret weapon" I'd like to share with you is probably the biggest surprise as I do not use it for what it's designed to be used for. Drum roll please...Its a white out pen! No, I do not use the white out pen to fix any corrections in my artwork. The white out pen is used for all my sequins, beading, pearls, and sometimes as that little sparkle in the eyes. The way to pull off the beading or sequin effect correctly is to first create a shadow for the beads or pearls with a black dot made with a Sharpie marker. (I love the new retractable Sharpies that are offered now.) Then you dot over the black with the white out pen and viola, you have your glitz and glam! You can check out Allie's necklace, Carrie's dress (a sequin leopard print fabric) or Kabuki's beaded gown to see the final result.
I hope you enjoyed this little trip into my tool box! Now maybe you'll look at fashion illustration a little differently!?!?

(The adorable pink scissor print paper is a purchase from the Martha Stewart Craft Sale!)

Book Time

Monday, June 8, 2009


Every now and then I receive emails through my etsy shop from aspiring illustrators and students asking for advice on fashion illustration. I've been asked everything from what my favorite marker brand is to what kind of classes I'd suggest taking to what books I'd recommend. Here are some great books from my collection:

The first book here was written by Steven Stipelman, Fashion Design Professor at the Fashion Institute of Technology. I was lucky enough to be taught by this amazing talent for four consecutive semesters. (It took a lot of schedule rearranging!) His book is an invaluable reference. The cover shown here is from the first edition, but more have been published since and each one with additional drawings. (A little birdie told me he's currently working on sketches for the next edition!)


20,000 Years of Fashion The History of Fashion and Personal Adornment is a great overview of the history of fashion from prehistoric costume to modern day fashion. It has hundreds of full color images of primary and secondary sources; photographs, paintings, sculptures and artifacts. It served as a text book for a Costume History course I took in college but I've continued to reference it through the years.

For unique examples of fashion illustrations of men, women and children created using a wide variety of media, The Big Book of Fashion Illustration is great. I bit the bullet and bought this book after sitting on the floor of the book store analyzing it page by page for over an hour!


Fashion Illustration Next is another book featuring really creative and artsy fashion illustrations in a multitude of mediums by 40 international illustrators.

My other books shown in the top photo of this post are: